As a decorator and crafter at heart, I face a common dilemma. Do I finish one room or space before moving onto the next project, or simply conquer something that inspires me at the moment? The reason this is a dilemma is because I am (thankfully) married to a very budget-conscience, cash-only, husband. Some weeks I have a little money to spend on enhancing our home and other weeks I have a little bit more (depending if I can convince my family to eat sandwiches for dinner). In truth, the Lord often convicts me of my envious heart. As a self-proclaimed designer and home stager, it is often difficult for me to be satisfied or content with my own home as I study other people's blogs and designer homes. But then graciously, the Lord reminds me what is most important. Him. He pulls me back into Him and redirects the desire of my heart: to love and serve Him above all.
Which brings me back full circle with a change of heart, attitude and perspective on the whole dilemma; how to decorate on a tight budget: one room at a time or one statement piece at a time? The answer is this. In the end it doesn't really matter. What matters is my Godly character, honoring the Lord, and serving others with the gift of hospitality. So whether I decide to focus my energies on a whole space or one random piece at a time, I need to remind myself that God comes first and my eternal residence is in heaven.
Wishing you all a blessed day!
Lindsey

Friday, May 27, 2011
Wall Vase idea

Source: Inspirations by D
Check out this tutorial over at Inspirations by D. I love this simple way of making your own wall vase. I even thought it would be kind of neat to stencil a tone on tone image on the wood behind the vase to give it a little more pizazz. Now I don't know if I want to make my own wall vases out of the cylinder vases I purchased from Dollar Tree after discovering this clever idea. Hmmm. I guess I could still give my version a try and see if it works, and maybe make one of these for somewhere else in the house or even for the back porch.
Below is the look I am trying to achieve (inspired by Arhaus) on a pennies budget. In the store they have several vases hung on the wall in big square grid. The vases I bought, as mentioned, are cylinders, but the idea is the same. Maybe I will glue nuts on the back and see if they will hold with a nail. I saw this done with wine bottles at a friend's house. Let the trials begin!

Wednesday, May 18, 2011
Starfish Centerpiece

I was just looking through my digital photo album and came across this adorable centerpiece that graced the tables at my friend, Maren's, bridal shower. Maren's friends went with a beach theme for her shower because she was going to have a destination wedding in the tropics. You will notice that they did a great job layering materials to make this centerpiece, both inside and outside of the vase. The sea foam green candle and oversized starfish were the perfect finishing touches to this beautiful centerpiece.
Tuesday, May 17, 2011
Peony-Candle Tablescape

Better Homes and Gardens
This tablescape from Better Homes and Gardens really caught my eye today. I have never seen this done with peonies before. Simply place a peony in a martini glass filled with water and place a tea light in the middle of the flower. Simple. Beautiful. Elegant.
Products I have to Post About
From time to time you might find me posting about products I like, especially if I use them often or the deal is (or was) amazing. I love it when other people share with me products they love too, so please feel free to post a message and share the love!
The first product I absolutely LOVE, are the reusable shopping bags I buy from Burlington Coat Factory. What I like about these bags is that they are made of a heavy duty vinyl, they come in adorable prints, and they stay upright when loading your groceries. I have used them for quick weekend get-aways and they are great for hauling around team snacks. And because they are vinyl, you can disinfect them easily with Lysol. They also make great gift bags, not only because the person who receives the gift now has a fashionable and reusable shopping bag, but also because they are cheaper than a typical gift bag at only a $1.99 each.

Next up are two food products I can't live without in my kitchen. I have become an Italian dressing snob, and really only care for Good Seasons Italian dressing. (In my opinion, it's best made with canola oil and apple cider vinegar or lemon juice). I was just recently introduced to the lemon juice idea last week, and it is a great summery version of this staple dressing I almost always have on hand.
The other food product that everyone should have in their pantry (or refrigerator after it's opened), is Trader Joe San Soyaki sauce from Trader Joe's. I have tried a kazillion different types of Asian influenced marinades and dressings, most of which I do not like, so when I found this product, it was instant fireworks. Okay, that was a little dramatic, but I do love this product! Thomas' favorite food is grilled salmon marinated in this soyaki sauce. I promise, it is hands down the best salmon! We also marinate chicken and pork tenderloin with it and often drizzle it over steamed veggies. YUM!

And last, but not least, I recently found a "faux" Mongolian Wool toss pillow (also known as a Tibetan Lamb Pillow) from Hobby Lobby for only $12.99! The real deal is $140 or more, but I am more than okay with the faux version because it achieves the same designer look for soooooooooo much less! My husband Greg, thinks this is a weird looking pillow (actually he said ugly), but this is coming from a guy who wears an unfashionable flannel shirt and dirty cowboy boots to church, so his opinion is immediately trumped. I am thankful Jesus wants us to just come as we are! Anyway, isn't this pillow fantastic???!!!!

Here's to great products and always shopping on a budget!
Lindsey
Monday, May 16, 2011
Honey Chipotle Roasted Nuts
One of my friends, Cara, asked if me if I prefer savory or sweet foods. I am definitely a savory food eater and would 99% of the time choose a delicious, savory meal over a sweet, sugar-inducing coma dessert. But let's be honest, in a perfect world, I would probably have both. So where do snacks fit into all of this? Well for me, it's every couple of hours before or after a meal, and this recipe for Honey Chipotle Roasted Nuts is definitely a savory snack. Why? Because it is both sweet and spicy at the same time and provides your body with protein, which is the only nutritious thing about this tasty treat. OH WELL! Enjoy!
And one more thing before I forget, I just recently learned from my Aunt Sue, that you should keep any red colored seasoning in the refrigerator such as Chili Powder, Chipotle Chili Powder, Cayenne Pepper, Paprika and so on. It helps to maintain the flavor longer.
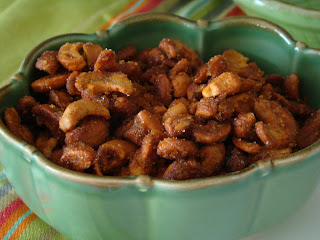
Honey Chipotle Roasted Nuts
2/3 cup sugar
2-3 teaspoon Chipotle Chili Powder *
1/2-1 teaspoon Chili Powder *
4 Tablespoons butter
4 Tablespoons honey
2 pounds roasted cashews (or any favorite nut)
Preheat oven to 325*F. Stir together sugar, Chipotle Chili Powder and Chili Powder in small bowl and set aside. Melt butter and honey in a large saucepan over medium heat until butter mixture is bubbly. Stir in the nuts until well coated, then pour out on to a large baking sheet.
Bake in preheated oven until the nuts are golden brown, about 15-25 minutes. Stir the mixture 2-3 times to ensure even cooking. Once done, scrape nuts into a large metal bowl and sprinkle with the spice mixture. Toss the nuts to evenly coat. Allow the nuts to cool to room temperature, tossing every few minutes so the nuts do not stick together.
* I prefer being on the generous side with the seasonings.
I found an air-tight glass jar at Tuesday Morning with a vintage vinyl number 1 on it for only $3.99. For an end-of-the-year teacher gift, I plan to fill it with these savory nuts, give it to Thomas' kindergarten teacher with an attached note that says, "We think you are NUMBER 1 and we were NUTS over you! Thanks for making kindergarten so special!" (Mrs. Wilson is truly one the world's greatest teachers!) I will post a picture of this gift at the end of this month.
And one more thing before I forget, I just recently learned from my Aunt Sue, that you should keep any red colored seasoning in the refrigerator such as Chili Powder, Chipotle Chili Powder, Cayenne Pepper, Paprika and so on. It helps to maintain the flavor longer.

This recipe was given to me by my aunt's friend, Lynda.
2/3 cup sugar
2-3 teaspoon Chipotle Chili Powder *
1/2-1 teaspoon Chili Powder *
4 Tablespoons butter
4 Tablespoons honey
2 pounds roasted cashews (or any favorite nut)
Preheat oven to 325*F. Stir together sugar, Chipotle Chili Powder and Chili Powder in small bowl and set aside. Melt butter and honey in a large saucepan over medium heat until butter mixture is bubbly. Stir in the nuts until well coated, then pour out on to a large baking sheet.
Bake in preheated oven until the nuts are golden brown, about 15-25 minutes. Stir the mixture 2-3 times to ensure even cooking. Once done, scrape nuts into a large metal bowl and sprinkle with the spice mixture. Toss the nuts to evenly coat. Allow the nuts to cool to room temperature, tossing every few minutes so the nuts do not stick together.
* I prefer being on the generous side with the seasonings.
I found an air-tight glass jar at Tuesday Morning with a vintage vinyl number 1 on it for only $3.99. For an end-of-the-year teacher gift, I plan to fill it with these savory nuts, give it to Thomas' kindergarten teacher with an attached note that says, "We think you are NUMBER 1 and we were NUTS over you! Thanks for making kindergarten so special!" (Mrs. Wilson is truly one the world's greatest teachers!) I will post a picture of this gift at the end of this month.
Antique Chic Desk
While visiting my sister for a girls' weekend last summer in Connecticut, we went treasure hunting at tag sales. I stumbled upon this beauty:

I took this "before" picture after I had taken off the gunked up brass drawer pulls, but I am sure you can imagine the sorry state they were in. I love the eclectic look of distressed furniture and things, and enjoy decorating by mixing pieces that are rustic (or in this case distressed) with with things that are shiny, like the satin nickel drawer pulls I added on for the finishing touch.
After filling in the holes from the old, gross hardware, I sanded the desk down and painted it with left over paint I used in our master bathroom (Silver Sage by Restoration Hardware). It was nice not spending a dime on more paint! I also dry brushed a dark walnut stain over the paint, but it went on way too dark. So, after the stain dried, I dry brushed on more Silver Sage. I finished the desk by adding a coat of semi-gloss polyurethane and new "polished" hardware. I love the end results!


You may have noticed that I do not have a desk chair in my pictures, and that's because I am still on the hunt for one. I am hoping to find a fun and funky parsons chair at TJ Maxx or somewhere like that. Overall, my style is very eclectic, combined with touches of traditional and modern, but the way to pull off an eclectic look is that every piece needs to be able to hold it's own (visually) in a space. That is why I can get away with using a chair from a different era.
I am looking forward to finishing up this front room/sitting room/tiny home office/entry way or whatever-you-want-to-call-it room.! Other future projects for this space include a DIY wall art of hanging glass vases filled with grass seed and natural elements (inspired by Arhaus and Pottery Barn), window treatments, pictures of my kids and dare I even say... a LIVE plant!
New Love: Chalkboard Vinyl (and paint)
Good morning friends! I have a confession. I have a new love in my life, and no, it's not burlap, it's chalkboard vinyl (and paint)! They are both a versatile and chic medium that provides a little whimsy to whatever they are on! I have collected a few ideas from some amazingly creative bloggers along with a couple of forever-inspiring websites to get the creative juices flowing. I am definitely consuming a full glass of inspiration today and hope you do too!


And here is an inspriation from Pottery Barn:
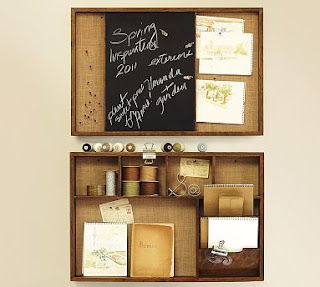

This is actually black construction paper, but the idea is the same. Source: Better Homes and Gardens


Chalkboard paint is also fun to use and achieves the same fun look. Check out these following ideas from http://www.countyliving.com/


And here is an inspriation from Pottery Barn:

Monday, May 2, 2011

Aunt Sue's Sweet Potato Fries
This delicious side is easy to make and compliments any dish, if you ask me. My Aunt Sue served them with grilled salmon drizzled with a garlic-ginger sauce and it was all mouth watering good! I actually made them last night to go along with our hamburgers! See what I mean? Her sweet potato fries can be a sophisticated "gourmet" side or it can simply replace traditional fries. Super yum!
Preheat oven to 375*F
In a medium bowl, mix 2 tablespoons canola oil, with a heaping teaspoon of minced garlic (I use the kind from a jar), and salt and pepper.
Next, peel 4-6 sweet potatoes and cut them into long skinny wedges. Toss potatoes in oil mixture, just enough to coat them. Bake fries on a cookie sheet sprayed with non-stick cooking spray. Bake for 20 minutes, then flip them and cook for another 20 minutes.
Subscribe to:
Posts (Atom)